I have spent far too many nights scrolling through marketplace listings and equipment sites, trying to figure out how to fit a commercial gym's worth of steel into a single-car garage. If you are tired of the membership price hikes and the guy doing curls in the only squat rack, you are probably ready to buy gym equipment of your own. But here is the reality: your budget is finite, and your floor space is even more limited.
Quick Takeaways
- Start with flooring; your foundation protects your equipment and your foundation.
- Invest in a high-quality 20kg barbell and iron plates before anything else.
- Prioritize a rack and a flat bench to unlock heavy compound movements.
- Save cables and cardio for the final phase once your strength base is set.
- Use the '3-Week Rule' to avoid impulse purchases that end up as clothes racks.
Why Trying to Build a Complete Setup on Day One is a Mistake
The biggest mistake I see beginners make is trying to recreate a 24-Hour Fitness in their basement overnight. You see those 'all-in-one' home gym packages with 40 different attachments and think you are saving money. You aren't. Most of that gear is built with thin 14-gauge steel and plastic pulleys that will feel crunchy within six months. When you are buying exercise equipment, quality beats variety every single time.
If you buy everything at once, you end up with a room full of clutter. I have seen guys buy leg extension machines before they even own a decent set of plates. Guess what happens? The machine gathers dust because they haven't even established a basic squat routine yet. A slow, phased approach allows you to learn what you actually enjoy training. It also lets you hunt for deals on the high-end stuff rather than settling for the cheap, bolt-together junk that wobbles when you rack a heavy bar.
Think of your gym as an evolving project. You want to purchasing fitness equipment that grows with your strength. If you buy a cheap rack today, you will just be buying a better one in two years. That is the 'cheap man's tax.' Avoid it by focusing on the heavy hitters first.
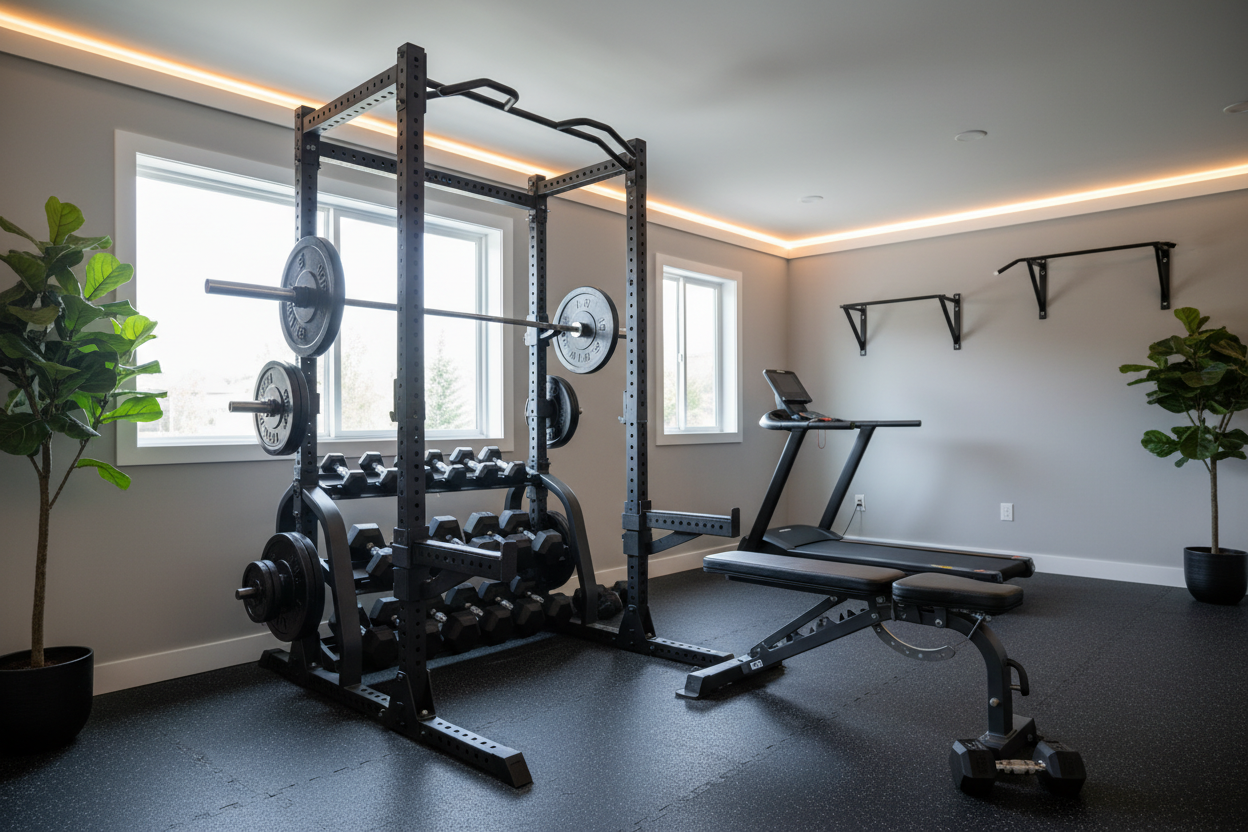
Phase 1: The Heavy Foundation You Can't Skip
Before the first piece of steel arrives, you need flooring. Don't buy those interlocking foam tiles from the big-box store; they will compress under a heavy rack and shift during lateral movements. Go to a farm supply store and get 3/4-inch thick horse stall mats. They are dense, smell like a tire shop for a week, and are virtually indestructible. This is the first step in building a home gym that actually lasts.
Once the floor is set, your next fitness equipment to buy is a legitimate Olympic barbell. Do not skimp here. A cheap bar has poor knurling that tears up your hands and bushings that don't spin, which puts massive stress on your wrists during cleans or presses. Look for a 20kg bar with a 28.5mm or 29mm diameter and a tensile strength of at least 190,000 PSI. This bar will be the centerpiece of every workout you do.
Next, you need weight. If you plan on doing deadlifts or cleans, get a pair of 45-lb bumper plates and fill the rest out with traditional iron. Iron plates are thinner, meaning you can fit more on the bar, and they have that classic 'clank' that just feels right. You can do almost an entire program—deadlifts, rows, overhead presses, and lunges—with just a bar, some plates, and a patch of rubber floor.
Phase 2: Racks, Benches, and Structural Support
Now that you can lift off the floor, you need to get under the bar. This is where you decide on a rack. If you are tight on space, a squat stand is fine, but a full power cage with 3x3-inch 11-gauge steel uprights is the gold standard for safety. If you are training alone, those safety spotter arms will literally save your life when you misjudge a heavy rep on the bench press.
When buying workout equipment for this phase, people often overcomplicate the bench. They want the one that tilts into fifteen different angles. My advice? Get a heavy-duty flat bench first. A flat bench is more stable, usually has a higher weight capacity (look for 1,000 lbs+), and doesn't have that annoying gap between the seat and the back pad. You can hit 90% of your chest work on a flat bench.
Check the hole spacing on your rack too. 'Westside spacing' (1-inch holes through the bench zone) allows you to set your safeties at the perfect height. It is the difference between a bar resting an inch off your chest and a bar pinning you because the next hole up was too high. These small specs matter more than the color of the powder coat.
Phase 3: When to Actually Look at Cables and Cardio
After you have your rack, bar, and bench, you have a 'Tier 1' gym. Now you can look at the 'nice-to-haves.' This is the time to consider a Smith machine home gym station if you are focused on bodybuilding and want the stability of guided tracks for high-rep hypertrophy work. Cables are great, but they take up a lot of room and cost a lot of money for what is essentially a supplement to your main lifts.
Cardio is another area where people blow their budget early. Don't buy a $2,000 treadmill that requires a monthly subscription just to work. If you need conditioning, a foldable upright exercise bike is a much smarter move. It has a tiny footprint, you can move it out of the way when you are doing deadlifts, and it provides plenty of resistance for zone 2 work or HIIT intervals.
This phase is about filling the gaps. Maybe you add a lat pulldown attachment to your rack or a pair of adjustable dumbbells that go up to 80 lbs. By waiting until Phase 3, you ensure that you actually have the floor space and the budget to get quality versions of these tools rather than the budget versions that break after a year.
The 3-Week Rule for Adding New Gear
I use a simple litmus test before I hit 'buy' on any new accessory. I call it the 3-Week Rule. If I feel like I need a specific piece of equipment—say, a landmine attachment or a specialized tricep bar—I have to wait three full weeks. During those three weeks, I have to try to mimic that movement with the gear I already own.
If, after 21 days, I am still frustrated by the lack of that tool and it is actively hindering my progress, I buy it. More often than not, I find a way to make do with a barbell and a towel, and the urge to spend $150 vanishes. This rule keeps your gym from becoming a graveyard of niche handles and 'as-seen-on-TV' gadgets that don't actually build muscle.
Personal Experience: My $400 Mistake
Early in my training, I bought a cheap 'all-in-one' cable machine from a local sporting goods store. It looked great in the photos. In person, the cables were sticky, the weight stack only went to 150 lbs, and the whole frame flexed when I tried to do seated rows. I used it for a month, realized it felt like a toy, and ended up selling it for $100 on Craigslist just to get it out of my way. I should have put that $400 toward a better barbell. Don't buy 'plastic' equipment for a 'steel' lifestyle.
FAQ
Is it cheaper to buy a gym package or individual pieces?
Packages look cheaper on paper, but they often include filler items you don't need. You are better off buying a high-quality rack, bar, and plates individually. You get exactly the specs you want without the 'fluff' accessories.
What is the minimum space I need for a home gym?
An 8x8 foot area is the bare minimum for a barbell setup. A standard Olympic bar is 7.2 feet long, so you need that width plus a little 'elbow room' on the sides to load plates without hitting the wall.
Should I buy bumper plates or iron plates?
If you do CrossFit or Olympic lifting where you drop the bar from overhead, get bumpers. If you are doing powerlifting or general strength training, iron plates are better because they are thinner and cheaper, allowing you to load more weight on the bar.
Share:
I Tracked Every Gym Item Price for 6 Months (Here's When to Buy)
Why Finding the Best At Home Exercise Machine Feels Like a Scam