I remember the first time I tried buying gym equipment for home. I was scrolling through online marketplaces at 2 AM, convinced that a $40 ab-cruncher and a set of plastic-coated sand weights were all I needed to build a physique. Three months later, that gear was holding up a laundry basket in the corner of my garage. I had no plan, no space, and a significantly lighter wallet.
Most people buy gear because it is on sale or because an influencer told them to. That is a recipe for a cluttered garage and a stagnant squat. You need a roadmap that prioritizes the 'big rocks' first. If you follow this chronological order, you won't just save money—you will actually build a place where you want to train every single day.
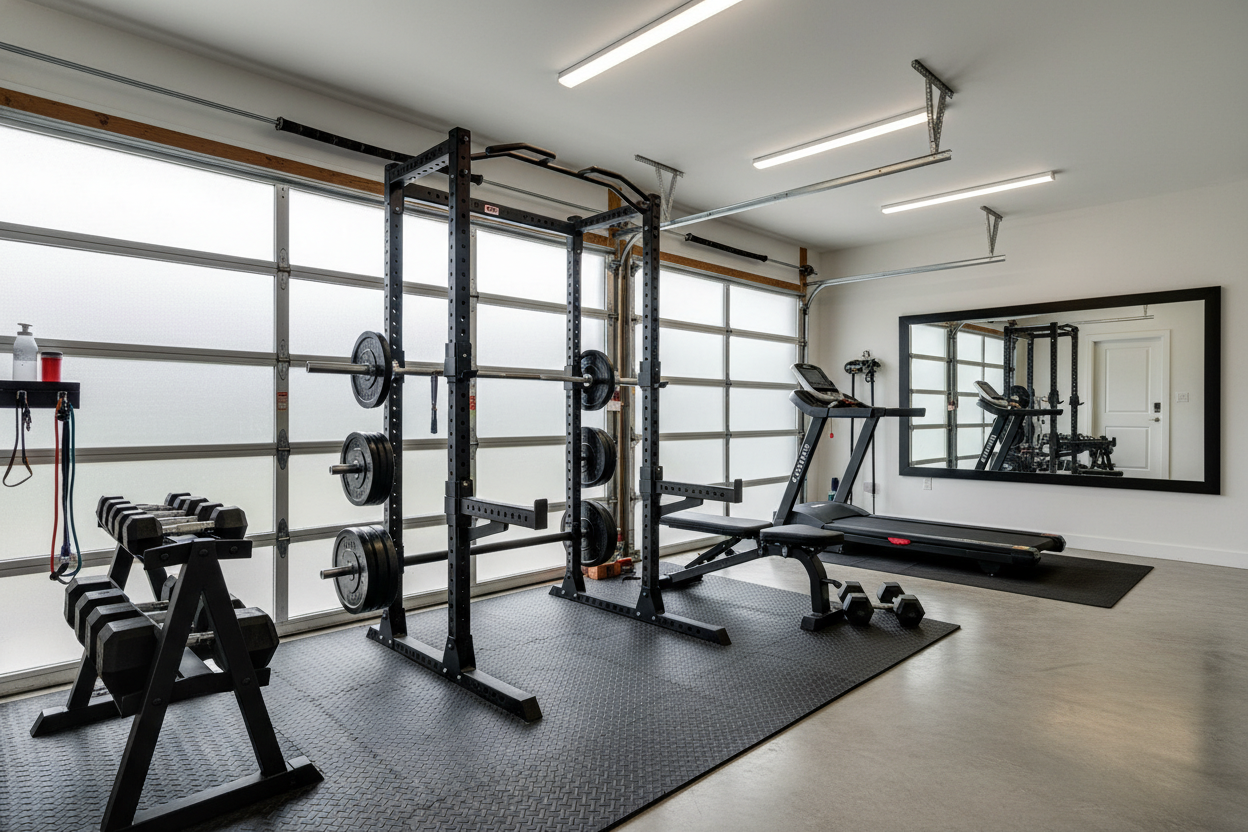
- Phase 1: Rack, Bar, and Plates (The Holy Trinity).
- Phase 2: Adjustable bench and dumbbells.
- Phase 3: Cable systems and specialized machines.
- The Gold Rule: If it only does one thing, don't buy it yet.
Stop Buying Gear at Random (You're Wasting Floor Space)
I see it every week in the home gym community: a guy with a $3,000 leg press machine but no power rack. He still has to drive to a commercial gym to squat because he ran out of room in his garage. This is what happens when you buy based on impulse rather than utility.
When you are buying home gym equipment, floor space is your most valuable currency. Every square inch must earn its keep. Buying a specialized piece too early locks you into a layout that might not work once you realize you need a real lifting platform. Start with the versatile tools and earn the right to buy the niche machines later.
Phase 1: The Heavy-Duty Foundation
Your gym lives and dies by three things: the rack, the bar, and the plates. If you get these right, you can perform 95% of the most effective movements in existence. If you get them wrong, you are constantly fighting your equipment instead of the weight.
Look for a rack with 3x3-inch or 2x3-inch 11-gauge steel uprights. Avoid the thin, 14-gauge stuff you find at big-box retailers; it will wobble the second you try to re-rack 225 lbs. Once you have the rack, you need iron. I prefer thin cast iron plates because you can fit more on the bar, but if you plan on dropping weights, go with crumb rubber bumpers. By investing in a complete home gym foundation early, you eliminate the need for a commercial membership immediately.
Why Your First Barbell Dictates Everything Else
The barbell is the only piece of equipment you actually touch during a lift. Don't buy the cheap chrome bar that comes in a 300-lb 'starter set.' Those bars usually have a low tensile strength (under 130,000 PSI), meaning they will permanently bend if you leave them loaded or drop them once.
Spend the extra $100 for a bar with at least 190,000 PSI tensile strength and decent knurling. If the knurling is too passive, the bar will slip out of your hands on deadlifts. If it is too aggressive, it will cheese-grate your shins. Find a middle-ground 'multi-purpose' bar with a bright zinc or cerakote finish to prevent rust in a humid garage environment.
Phase 2: Expanding Your Lifts Without Cluttering the Garage
Once you can squat, bench, and pull, it is time to fill the gaps. You need an adjustable bench. It should be heavy—at least 70 lbs—so it doesn't slide around when you are trying to drive your shoulders into the pad. Look for one with a minimal 'pad gap' so your lower back isn't falling into a hole during flat benching.
Next are dumbbells. If you buy a full rack of fixed dumbbells, you have just lost half your garage. For home use, adjustable dumbbells or loadable handles are king. They take up two square feet but replace 15 pairs of traditional weights. This keeps your floor clear for things like jump rope, stretching, or burpees.
Phase 3: When to Actually Buy Machines and Cables
After a year or two of heavy barbell training, you will probably want some isolation work. This is the stage where a versatile smith machine home gym station makes sense for hitting failure safely on chest day without a spotter. Cables provide constant tension that you just cannot get from free weights.
When looking at cable machines, pay attention to the pulley ratio. A 1:1 ratio means if the stack says 100 lbs, you are pulling 100 lbs. A 2:1 ratio (common in functional trainers) feels like 50 lbs but gives you more cable travel. For a home setup, a 2:1 ratio is usually better for accessory movements like face pulls and crossovers because the movement is smoother and the footprint is smaller.
The Gadget Trap: What to Avoid Completely
Marketing is a powerful thing. You will be tempted by 'as seen on TV' machines that promise a six-pack in six minutes. Ignore them. If a piece of equipment only allows you to do one specific movement and costs $400, it is a trap. Do yourself a favor and stop buying single-use gear that clutters your space without adding real value to your strength.
I once bought a 'vertical leg press' because I thought it would save space. It was a nightmare to load, felt sketchy on my lower back, and I ended up selling it for half what I paid two months later. Stick to the basics. If you cannot do at least five different exercises on a piece of gear, it probably doesn't belong in a home gym.
Personal Experience: My $600 Mistake
When I started, I bought a cheap 'all-in-one' rack from a local sporting goods store. It had a built-in bench and a flimsy lat pulldown. Within six months, the cables frayed, and the rack started to tilt because the steel was so thin. I ended up having to buy a real power rack anyway. I essentially paid a $600 'impatience tax.' Buy the high-quality version of what you need the first time, even if you have to wait an extra month to save up the cash.
FAQ
How much space do I actually need?
A standard 8x8 foot space can fit a full power rack and a bench comfortably. If you want to do deadlifts outside the rack, aim for a 10x12 foot area to avoid hitting walls with your barbell.
Should I buy used or new?
Buy plates and racks used if you can find them—steel doesn't expire. Always buy your barbell and your adjustable bench new. You do not want a bar with a hidden bend or a bench with a failing adjustment mechanism.
What flooring should I use?
Skip the 'fitness' foam tiles. They compress and slip. Go to a farm supply store and buy 3/4-inch thick rubber horse stall mats. They are indestructible, heavy enough to stay put, and a fraction of the price of gym-branded flooring.
Share:
I Built My Entire Garage Setup Around One Barbell at Home
Don't Bolt That Rack Yet: Surviving a DIY Home Gym Install