I remember the night I decided to make an at home gym. My commercial gym had just hiked their monthly dues again, the squat rack always had a three-person line, and the air conditioning was permanently broken. I went home, opened five tabs of equipment sites, and almost dropped four grand on a 'complete package' that would have left me with zero floor space and a lot of buyer's remorse. I thought I needed everything on day one to be 'serious.'
- Buy for the training you actually do, not the training you imagine you'll do in six months.
- Prioritize a high-quality barbell over everything else; it is the only piece of gear you touch on every single lift.
- Floor space is your most valuable asset—don't crowd it with cheap, single-use machines.
- Phased buying saves thousands of dollars and prevents 'clutter fatigue' in your garage or spare room.
The Commercial Facility Illusion (And Why It Fails)
You walk into a 10,000-square-foot warehouse gym and see rows of fifteen different chest machines. It looks impressive, so you think you need to recreate that vibe at home. This is the fastest way to blow your budget on low-grade junk that will eventually become a very expensive clothes rack. When people try to build a real gym at home, they often forget that commercial gyms have that variety because they have to accommodate five hundred different people. You only need to accommodate one.
If you buy a 'full set' of cheap gear, you end up with 14-gauge steel racks that shake when you re-rack 135 pounds and barbells with bushings that stop spinning after a month. I've seen it a hundred times. You're better off with three pieces of high-end gear than twelve pieces of scrap metal that make you hate your workout space.
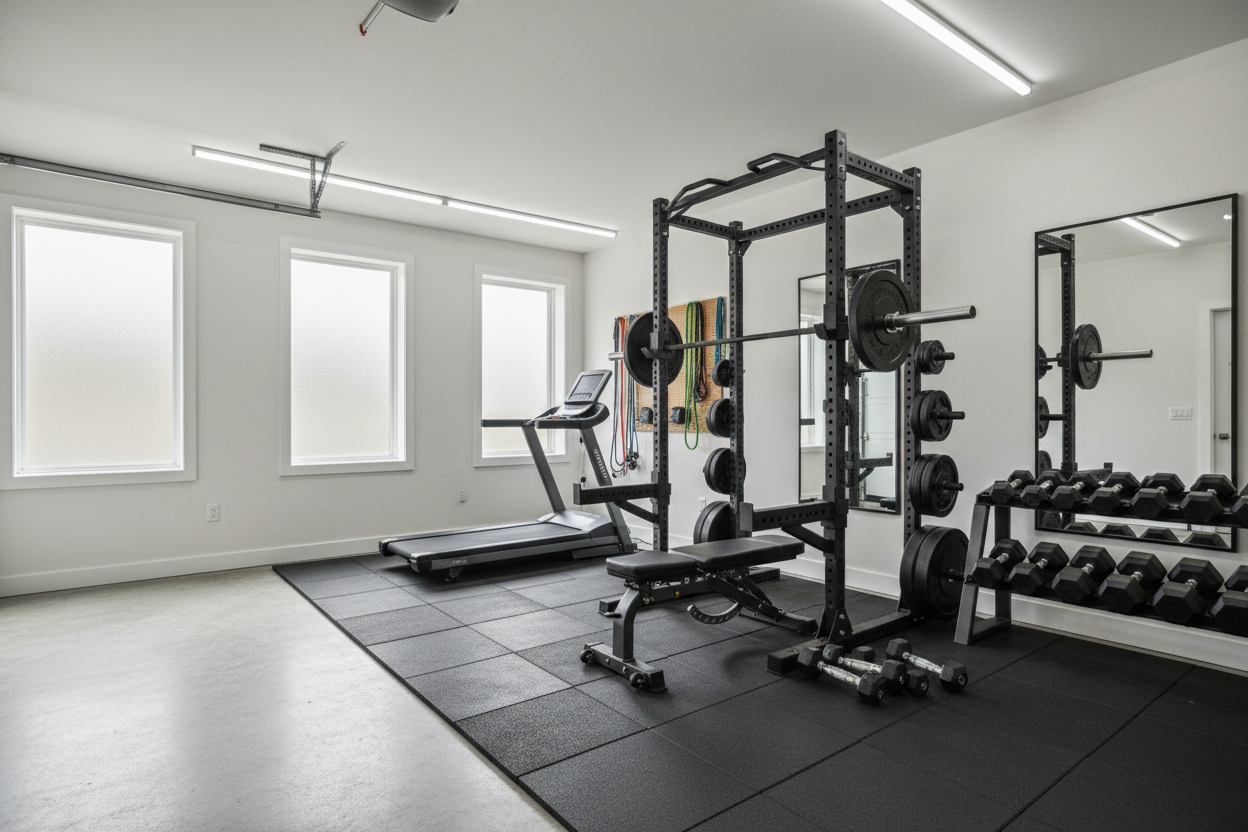
Phase 1: Starting a Home Gym Essentials
The foundation of any real training space is the 'Big Three': a rack, a bar, and plates. If you are starting a home gym, look for a power rack made of at least 11-gauge steel. Whether it's 2x3 or 3x3 tubing, you want something that doesn't require being bolted to the floor if you're a renter, though bolting is always safer. A rack with 5/8-inch or 1-inch holes gives you the most flexibility for future attachments.
Next, don't skimp on the bar. A good multi-purpose bar with a 190,000 PSI tensile strength will last your entire life. Pair it with some crumb rubber or urethane bumper plates. If you're doing powerlifting moves, iron is fine, but bumpers give you the freedom to drop weights without cracking your concrete slab. You can do 90% of any program with just these three items.
Why You Should Skip the Dumbbell Rack (For Now)
A full set of hex dumbbells from 5 to 50 pounds takes up a massive 6-foot footprint and costs a fortune in shipping. Unless you have a three-car garage to play with, use your barbell for heavy presses and rows. If you need isolation work, get a pair of loadable handles or high-quality adjustable dumbbells. You'll save $800 and about 15 square feet of floor space that you'll definitely need later for a bench or a rower.
Phase 2: Adding Machines When You Actually Need Them
After about three months of consistent lifting, you'll start to notice the gaps. Maybe your joints are feeling the 'barbell-only' fatigue, or you're hitting a plateau because you can't safely push to failure on a solo bench press. This is when you look at a Smith machine home gym station. It provides that fixed-path stability for high-volume hypertrophy work without needing a spotter.
This is also the time to look at cable systems. A simple wall-mounted pulley or a functional trainer adds hundreds of movements—lat pulldowns, cable flyes, and tricep extensions—that are hard to replicate with just a bar. Look for a 2:1 pull ratio if you want more cable travel for functional movements, or a 1:1 ratio if you want the weight to feel heavy for lat work.
Phase 3: The Specialty Upgrades That Actually Matter
Phase 3 is for the 'nice-to-haves' that target your specific goals. If you've realized your posterior chain is lagging, that’s when you invest in a dedicated hip thrust machine. These are footprint-heavy, but if glute development is your primary focus, it beats the ten-minute setup of balancing a loaded barbell on your lap with a foam pad.
Specialty bars like a Safety Squat Bar (SSB) or a multi-grip Swiss bar also fall into this category. These aren't essential for day one, but they are essential for longevity if you have cranky shoulders or limited mid-back mobility. Only buy these once your foundation is heavily utilized and you know you aren't going to quit after six weeks.
Stop Overthinking How to Gym in Home
The biggest hurdle isn't the gear; it's the friction of getting started. You don't need a perfectly curated, color-matched Instagram room to get huge. I’ve trained in garages where I had to move a lawnmower just to find room to deadlift. The best setup is the one that removes your excuses. Focus on the exercise at home gym setups that actually force you to put in the work.
How much space do I really need?
A standard 8x8 foot area is the 'golden zone.' It fits a full-sized 7-foot Olympic bar with about six inches of clearance on either side and enough depth for a power rack and a bench. If you have less than that, look into short-bar options or folding racks.
Is used equipment worth it?
For iron plates and dumbbells, absolutely. Heavy metal is heavy metal. However, I never buy used barbells or anything with moving bearings (like pulleys) unless I can test them in person. A rusted bearing is a nightmare to fix and usually means the equipment was stored in a damp shed.
What is the best flooring for a garage?
Skip the 'fitness' foam tiles you see at big-box stores. They compress under heavy weight and tear easily. Go to a farm supply store and buy 3/4-inch thick horse stall mats. They are indestructible, provide better vibration dampening, and cost half as much as 'official' gym flooring.
Share:
I Spent 3 Months Testing the Major Fitness Home Gym Barbell
How to Safely Handle a 50 kg Dumbbell in a Solo Garage Gym